
“Check The Door” device for monitoring temperature in a refrigerator. This project is based on a D1 mini pro board. A one-wire shield is used to interface to a DS18B20 temperature sensor. Since AC power is difficult to come by inside a refrigerator, a LiPo battery powers the device.
*** Warning ***
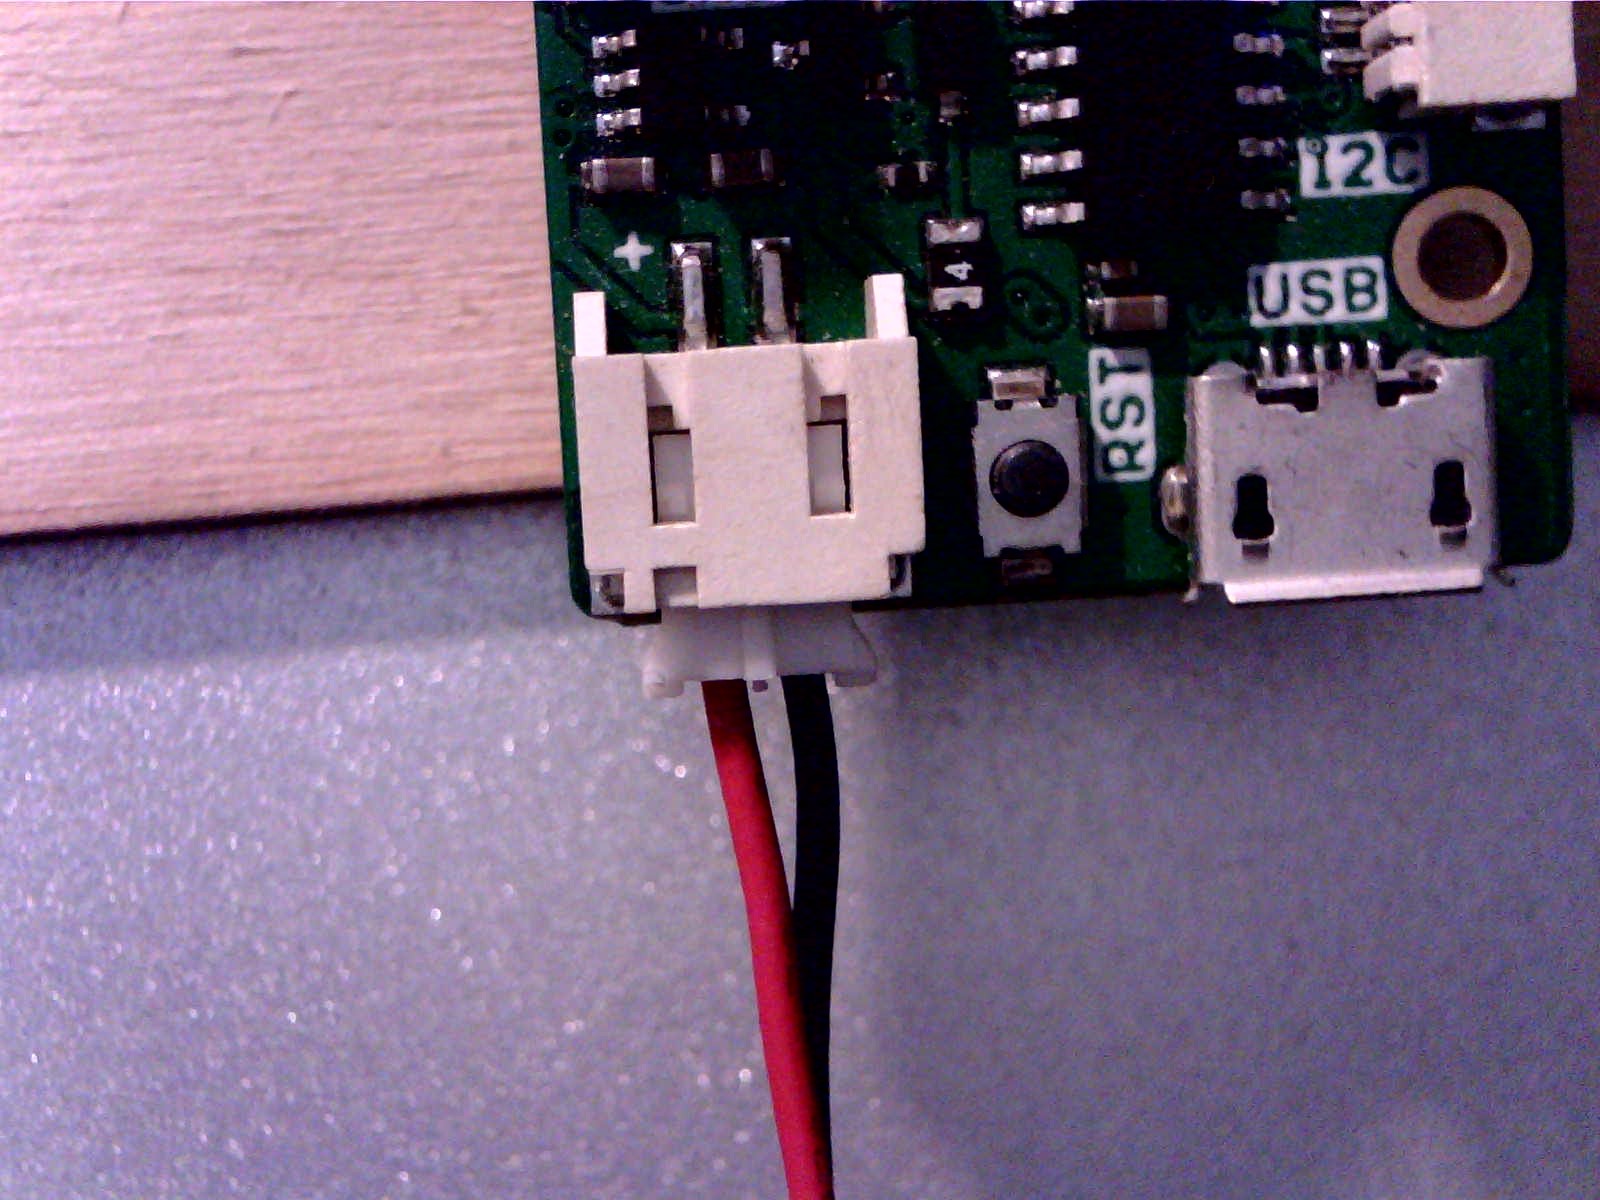
LiPo batteries with JST connectors come in two flavors. Red on the right and red on the left. The quadcopter community uses one flavor and D1 mini Pro boards use the other. The ones I purchase from Amazon are the wrong polarity for a D1 mini Pro. I manually swap the leads inside the JST connector. The red wire should match up with the ‘+’ symbol on the board as seen in the picture below.
Basic Concept
The CTD device wakes up periodically and checks the temperature and the battery voltage. If the temperature is too hot or too cold, a “Temperature out of range” notice is posted to a registered device (cellphone) running the Pushover app. If the battery voltage is too low, a “Battery needs charging” notice is posted. Once a day, a low priority “Daily status message” is posted.
Configuration
The device is configurable through a web interface run by the ESP8266 processor on the D1 mini Pro board. To enable the web interface, you must depress the switch (circled in read below) on the purple shield while the device boots. The device boots every N seconds (one of the things you can configure), but you can also boot by pressing the RST switch (circled in read below) on the D1 mini Pro board. Press the switch on the shield, press and release the switch on the D1 mini Pro, and release the switch on the shield. The builtin LED on the D1 mini Pro should be blinking if you are in AP mode.


Once the device is in AP mode, you can connect to it via WiFi from a cellphone or laptop. The SSID will be CTD_xxxxxx (where the x’s are six hexadecimal characters reflecting the last half of the MAC address of the D1 mini Pro board). There will be no passphrase required. If you do not connect to the device within 10 minutes, it will go back to sleep. Once connected, use a web browser to view the webpage at http://192.168.4.1. It will look something like this:

Parameters
SSID – the Service Set IDentifier of your WiFi network that the device will connect to in order to send notifications to api.pushover.net. This is a text field limited to 32 characters.
Passphrase – the passphrase of your WiFi network.
User token – the User Key of your device provided to you by Pushover when you download and run their app. More details are available here. This key is specific to you (your cellphone) and will be used to send notifications to your device.
Device ID – a single character used to identify your CTD device. If you want to monitor multiple refrigerators, you will need to change this ID so that you can tell which device is sending the notice.
High temp – the high temperature setpoint in tenths of degrees Fahrenheit. For example, 460 means to send a notification if the temperature is > 46.0 F.
Low temp – the low temperature setpoint in tenths of degrees Fahrenheit. For example, 320 means to send a notification if the temperature is < 32.0 F.
Low Battery Warning – The low battery setpoint. The value of this field is compared to the 10 bit value read from the A0 analog input pin. On the back side of the D1 mini Pro, there is a solder jumper (BAT-A0) that routes the LiPo battery voltage through a voltage divider to the A0 pin. So, the value is related to the battery voltage, but the actual units are somewhat mysterious. Add a comment if you really want the details. A value of 750 is suggested.
Sleep duration – number of seconds to sleep between checking the temperature. The longer you sleep, the longer the battery lasts. There is a limit of 4200 seconds (70 minutes).
Beep duration – number of microseconds the beep of the speaker lasts. 50 is a good value. The device beeps once each time it wakes up. Additional beeps indicate some error condition.
Timing Adjustment – number of seconds to add to 24 hours to account for inaccuracy of the internal oscillator of the D1 mini Pro processor. The device will try to send the “Daily status message” at 0:00:00 GMT. If it is consistently early or late, you can enter a value here to try to compensate for the inaccuracy. Entering a positive number should make the daily status message get issued later.
Phone home – checkbox to enable sending a copy of the daily status message back to the developer (me).
USB powered – checkbox indicating that the device is expected to be powered by USB rather than battery. If you remove the device from the refrigerator and plug it into a USB charger, you do not want to be pestered by temperature notices. This is the default behavior. If you expect to power the device via USB while it is in the refrigerator, you do want to be notified of temperature excursions, so you would check this checkbox.
Submit – once you have set the parameters as desired, click the OK button beside the Submit label. The device will save any changed parameters to EEPROM.
Exit AP mode – once you have submitted your changes, you can click this link to have the device exit AP mode and go to sleep. Alternatively, you can disconnect from WiFi and allow the device to time out after 10 minutes.
Beep Codes
When errors happen, the device will beep some number of times. Note that the one beep from booting may confuse you in counting additional beeps that happen soon after booting. For example, you may hear three beeps, but it is actually one beep from booting followed by two beeps from failing to connect to WiFi. There will be a longer pause between the first beep and the second than between the second and third. It can be difficult to hear the difference.
one beep – device booting
two beeps – device unable to connect to WiFi. This will be repeated up to three times before the device goes back to sleep.
three beeps – unable to connect to api.pushover.net. This would happen if your WiFi network was not connected to the Internet. This will be repeated up to three times before the device goes back to sleep.
four beeps – the POST message sent to Pushover was bad. There is nothing you can do to fix this. Contact the developer.
five beeps – bad status returned by Pushover in response to the POST message. Untested.
six beeps – bad CRC communicating with the DS18B20 temperature sensor. Untested.
seven beeps – no DS18B20 temperature sensor detected.
eight beeps – timeout sampling the DS18B20 temperature sensor. Untested.
Pseudocode
setup()
  Turn on builtin LED
  Restore settings from EEPROM
  Initialize serial output and print settings
  See if USB power (+5v) is available
  Setup the temperature probe (start sampling)
  Beep once
  Restore settings from RTC memory
  If the switch on the shield is closed, enable AP mode
loop()
  if AP mode {
    handle webserver
  } else {
    handle temperature probe and pushover notification
  }