
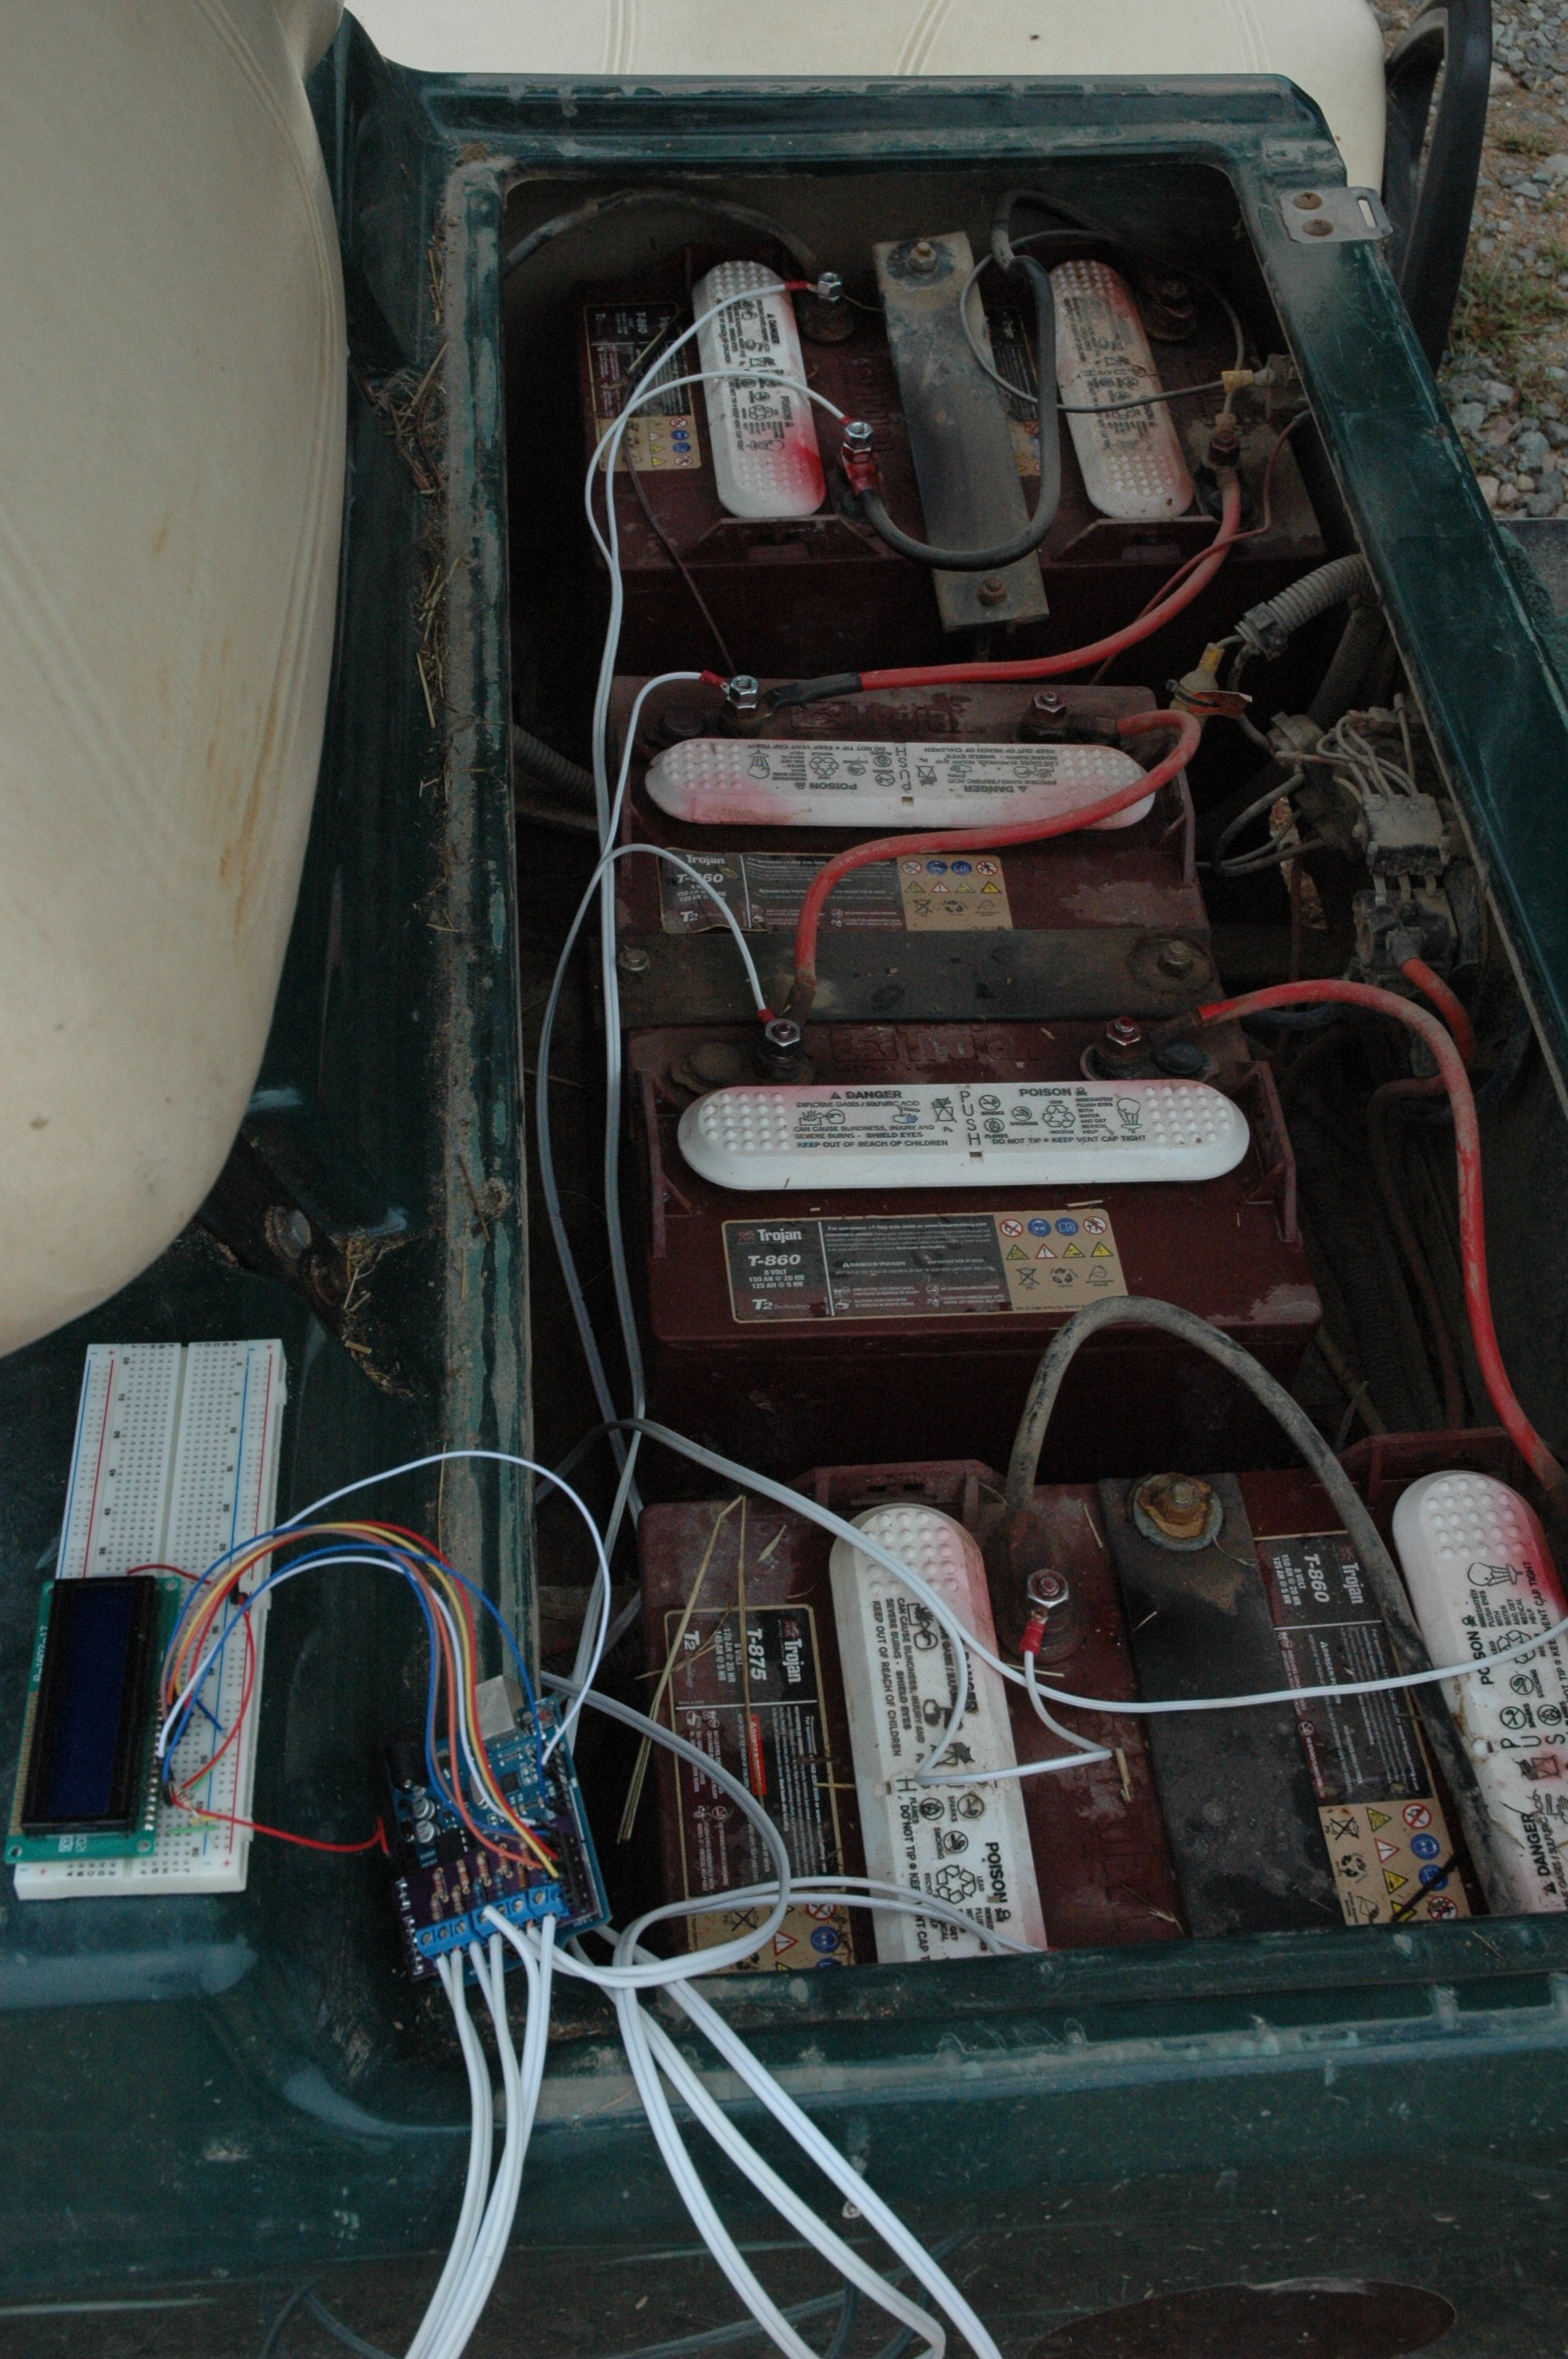
As I mentioned on my profile page, I spend some time at a local horse farm. They have a golf cart that gets used and abused. Recently, my wife commented that it is running slowly. So, I checked the water level in the six 8.8V lead acid deep discharge batteries and replaced one of the 6 gauge cables that appeared corroded. A fresh charge and it seemed to work well. Of course, a few days later it was back to running slowly. So, I figured this would be a great Arduino project. Using all 6 of the analog input pins on an Uno, I would hook up voltage dividers to the + side of each battery (8.8, 17.6, 26.4, 35.2, 44.0, 52.8 volts).
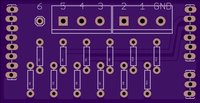
I designed a shield for this project (I have learned that shields do not need to cover the entire Arduino board). Here is a thumbnail of the GCBMv1.0 board.
I had to figure out reasonable resistor values (using resistors I have in my parts bin) for each divider network to get a little below 5V to feed to the analog in pins.
| Vin | R1 | R2 | Vpin |
| 10 | 4700 | 3300 | 4.125 |
| 20 | 10,000 | 3300 | 4.962 |
| 30 | 20,000 | 3300 | 4.249 |
| 40 | 27,400 | 3300 | 4.300 |
| 50 | 33,000 | 3300 | 4.545 |
| 60 | 47,000 | 3300 | 3.936 |
So, how do you test 53v signals if you don’t have a fancy bench power supply? 9V batteries snap together quite nicely.

To compute the input voltage, I use some code like this:
uint16_t b1 = analogRead(A0);
float v1 = b1 * 0.0118487;
That magic constant (0.0118487) is computed as:
Vcc/1023*(R1+R2)/R2
5.00/1023*(4700+3300)/3300
But things are never quite that simple. The actual resistance of my resistors is not exactly 4.7k and 3.3k. The voltage of my Arduino Uno is not exactly 5.0v. Pete recently sent out a pointer to a site that tells you how to use the internal 1.1 vref of an Atmel chip to somewhat accurately measure the input voltage. In the end, I just measured the voltage with a voltmeter and read the analogRead value and computed a proper conversion factor. The exact values do not really matter for what I am trying to do. I want to see relative voltage as a function of time and load (driving uphill, stopped, …).
So, I hooked up to all of the batteries in the golf cart
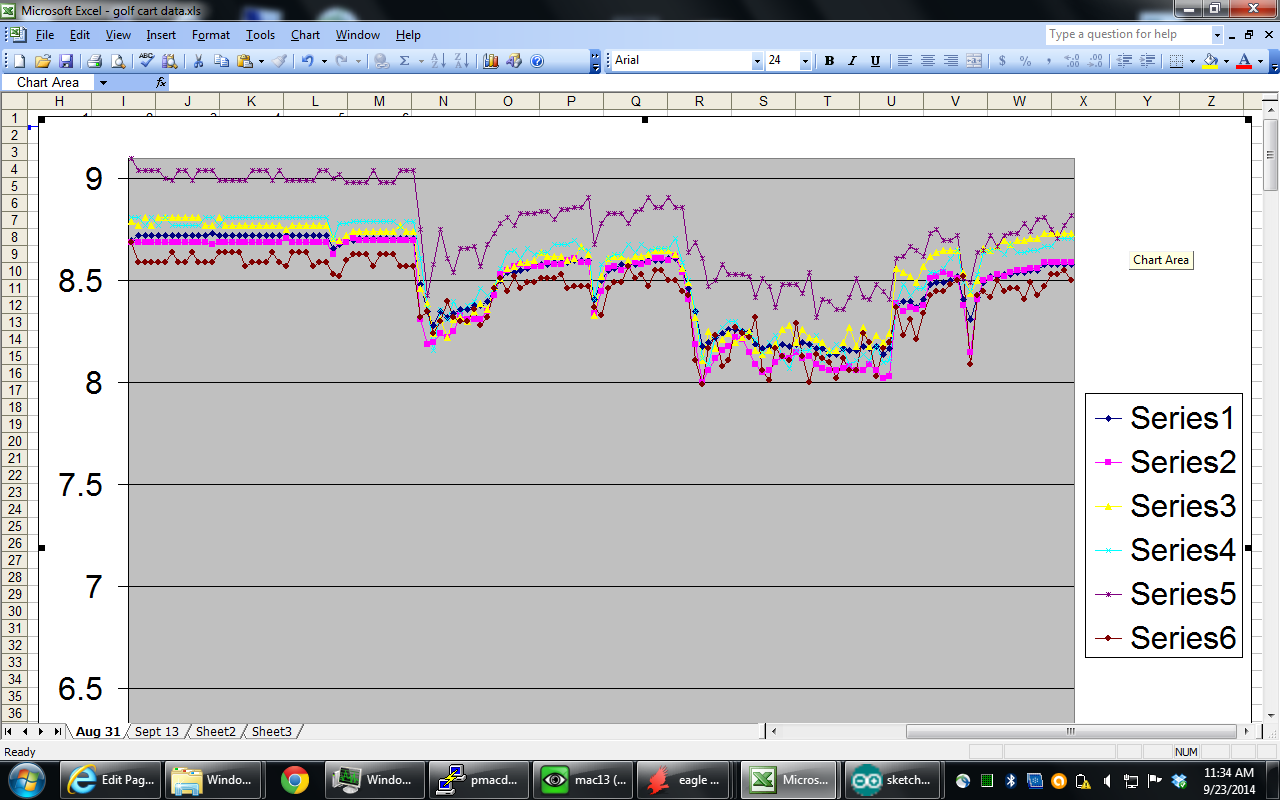
and collected some data. The first 30{13079d06258ef9010cea88dee32f3cdfc6f216a54651010f7303ce6140ee927c} of the chart is stopped. The next 25{13079d06258ef9010cea88dee32f3cdfc6f216a54651010f7303ce6140ee927c} is driving downhill. The last 45{13079d06258ef9010cea88dee32f3cdfc6f216a54651010f7303ce6140ee927c} is driving back uphill. This was before I tuned the magic constants, so I do not think that Series 5 being higher than the other batteries is significant.
Nothing too surprising from this data. So, I removed my equipment and waited. Two weekends later, my wife said it was slow again, so I did another data collection run.
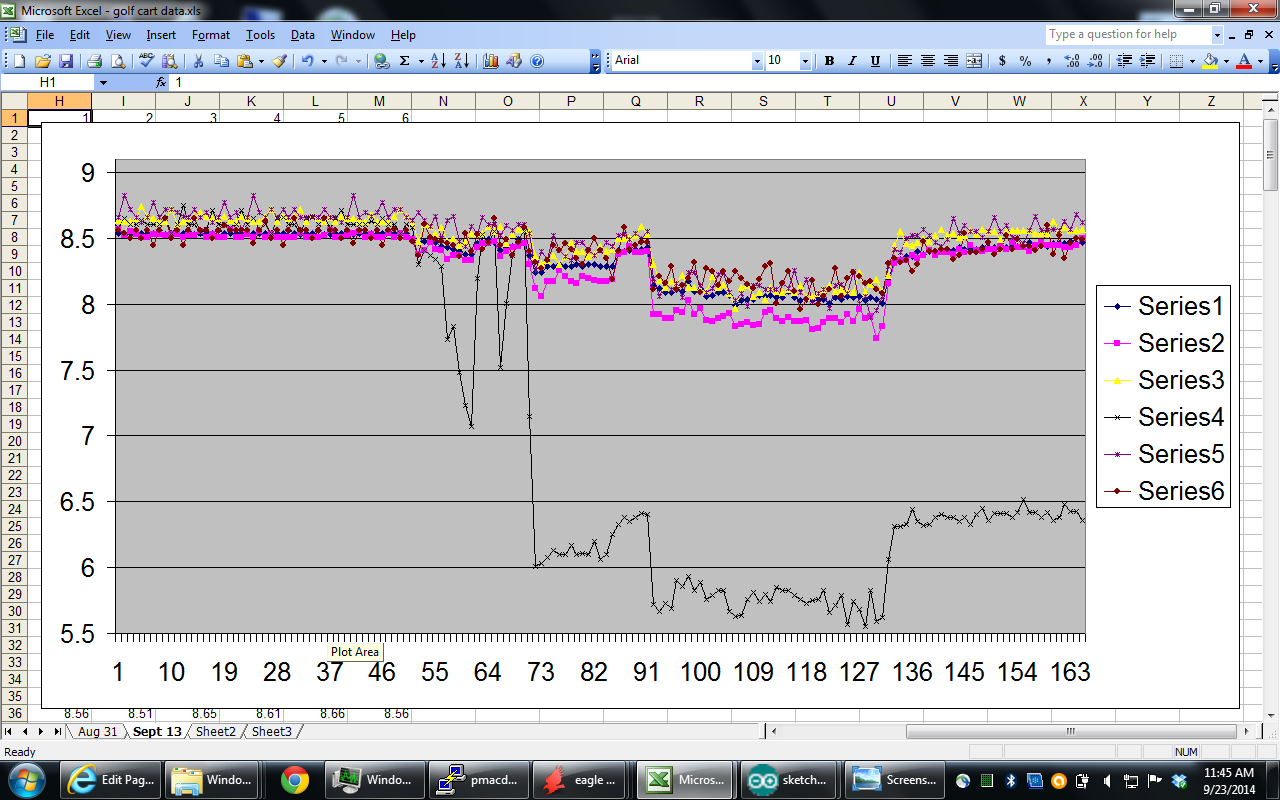
Wow, quite different. Battery 4 is showing serious voltage droop under load. Looks like that one is a candidate for replacement.
Here is the code (remove the .txt and put it in a directory called GolfCartBatteryMonitor). You can remove the lcd code and just monitor things from the serial monitor.
GolfCartBatteryMonitor.ino
Is the code available for this project?
I posted the code. It is an Arduino sketch, so you have to follow the convention of putting it in …/Foo/Foo.ino, so GolfCartBatteryMonitor/GolfCartBatteryMonitor.ino
Thanks for the code post. Any additional progress on this project since you originally made it?
BTW ordered the shield. Thanks for putting this together.
Thanks for the interest in the project, Tim. I have not done any further development on this.
Any guidance on using an IC2 lcd on the code instead of a standard pwm lcd pin layout?
You would have to rip out the LiquidCrystal code and replace it with code from a library for your I2C lcd. That should not be too difficult of a job.